
The Singleton pattern is probably one of the first design patterns many developers hear about. The idea behind it is simple: if an application needs only one instance of a class, we should create that instance once and use the same object wherever it is required.
The implementation also looks quite simple at first, but there are a few important things to understand. How do we stop other classes from creating new objects? What happens when multiple threads try to access the instance at the same time? And in modern .NET applications, should we still create Singleton classes manually, or should we simply use the Singleton lifetime provided by Dependency Injection?
In this article, we will understand the Singleton Design Pattern with a practical example, implement it using different approaches, and finally see how Singleton is commonly handled in modern .NET applications.
What Is the Singleton Design Pattern?
The Singleton Design Pattern ensures that only one instance of a class is created and provides a common way to access that instance throughout the application. Instead of allowing every part of the application to create a new object, the class itself controls the creation of its instance.
Normally, when a class has a public constructor, we can create as many objects as we want. Each object has its own memory allocation and can maintain its own state. This is expected behavior for most classes, but there are some situations where creating multiple instances is unnecessary or can create inconsistent behavior.
For example, suppose an application has a shared logger that maintains some application-level information. If every service creates its own logger instance, we may end up managing multiple objects even though all of them are performing the same shared operation. In such cases, having one shared instance can make more sense.
The Problem Without Singleton
Let's create a simple NormalAppLogger class. I have added an InstanceId property only to identify whether the application is using the same object or creating a new one.
public class NormalAppLogger
{
    public Guid InstanceId { get; } = Guid.NewGuid();

    public void Log(string message)
    {
        Console.WriteLine($"[{InstanceId}] {message}");
    }
}
Now let's create two objects of this class and log a message from both instances.
var logger1 = new NormalAppLogger();
var logger2 = new NormalAppLogger();

Console.WriteLine("Without Singleton");
logger1.Log("Message from logger 1");
logger2.Log("Message from logger 2");

Console.WriteLine($"Same instance: {ReferenceEquals(logger1, logger2)}");
The output for this example is shown below:
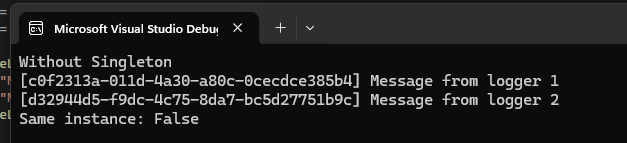
Both objects have different InstanceId values because new NormalAppLogger() creates a separate object every time. The final comparison also returns False, confirming that logger1 and logger2 are two different instances.
For this example, assume our application requires only one shared logger instance. We don't want different parts of the application to create their own NormalAppLogger objects, so we need to control how the instance is created.
Implementing the Singleton Pattern
A basic Singleton implementation can look like this:
public sealed class NormalSingletonAppLogger
{
    private static NormalSingletonAppLogger? _instance;

    private NormalSingletonAppLogger()
    {
    }

    public static NormalSingletonAppLogger Instance
    {
        get
        {
            _instance ??= new NormalSingletonAppLogger();

            return _instance;
        }
    }

    public Guid InstanceId { get; } = Guid.NewGuid();

    public void Log(string message)
    {
        Console.WriteLine($"[{InstanceId}] {message}");
    }
}
The first important change is the private constructor. Since the constructor is private, other classes cannot create a NormalSingletonAppLogger object using the new keyword. This gives the NormalSingletonAppLogger class complete control over how its instance is created.
The _instance field is static because the Singleton instance belongs to the class itself rather than to a specific object. The public Instance property checks whether an object has already been created. If _instance is null, it creates a new NormalSingletonAppLogger; otherwise, it simply returns the existing object.
Now we can access the logger using the Instance property.
var logger1 = NormalSingletonAppLogger.Instance;
var logger2 = NormalSingletonAppLogger.Instance;

Console.WriteLine("Normal Singleton");
logger1.Log("Message from normal singleton 1");
logger2.Log("Message from normal singleton 2");
Console.WriteLine($"Same instance: {ReferenceEquals(logger1, logger2)}");
The output for this example is shown below:
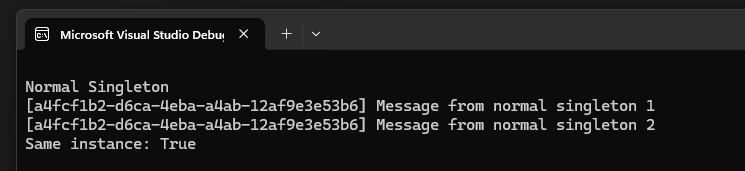
No matter how many times we access NormalSingletonAppLogger.Instance, the same object is returned.
The Thread Safety Problem
The basic Singleton implementation works correctly in a simple application, but it can create a problem when multiple threads access the Instance property at the same time. The issue exists during the initial creation of the Singleton object.
Consider the following code from our Instance property:
_instance ??= new NormalSingletonAppLogger();Suppose Thread A checks _instance and finds that it is null. Before Thread A creates the object, Thread B also reaches the same code and checks _instance. Since Thread A has not created the object yet, Thread B also sees a null value.
At this point, both threads can execute new NormalSingletonAppLogger() and create separate objects. This breaks the main purpose of the Singleton pattern because the application may temporarily create more than one instance.
This type of issue may not happen every time we run the application. It appears during concurrent access, which also makes it difficult to reproduce in simple testing.
Creating a Thread-Safe Singleton
We can make the Singleton implementation thread-safe using lock.
public sealed class LockAppLogger
{
    private static LockAppLogger? _instance;

    private static readonly object LockObject = new();

    private LockAppLogger()
    {
    }

    public static LockAppLogger Instance
    {
        get
        {
            lock (LockObject)
            {
                _instance ??= new LockAppLogger();

                return _instance;
            }
        }
    }

    public Guid InstanceId { get; } = Guid.NewGuid();

    public void Log(string message)
    {
        Console.WriteLine($"[{InstanceId}] {message}");
    }
}
Usage example:
Console.WriteLine("With Lock");

var logger1 = LockAppLogger.Instance;
var logger2 = LockAppLogger.Instance;

logger1.Log("Message from lock singleton 1");
logger2.Log("Message from lock singleton 2");
Console.WriteLine($"Same instance: {ReferenceEquals(logger1, logger2)}");
The lock ensures that only one thread can execute the instance creation code at a time. If Thread A enters the locked block, Thread B has to wait until Thread A completes its execution and releases the lock.
Once Thread A creates the LockAppLogger instance, Thread B enters the block and finds that _instance already contains an object. Instead of creating another object, it returns the existing instance.
This solves the thread safety problem, but the lock is still executed every time we access the Instance property. Even after the Singleton instance has already been created, every request must enter the locked block.
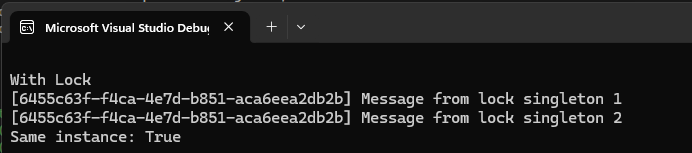
The output for the lock-based singleton is shown below:
We can avoid unnecessary locking using double-check locking.
public sealed class DoubleCheckAppLogger
{
    private static DoubleCheckAppLogger? _instance;

    private static readonly object LockObject = new();

    private DoubleCheckAppLogger()
    {
    }

    public static DoubleCheckAppLogger Instance
    {
        get
        {
            if (_instance is null)
            {
                lock (LockObject)
                {
                    _instance ??= new DoubleCheckAppLogger();
                }
            }

            return _instance;
        }
    }

    public Guid InstanceId { get; } = Guid.NewGuid();

    public void Log(string message)
    {
        Console.WriteLine($"[{InstanceId}] {message}");
    }
}
Usage example:
Console.WriteLine("With Double-Check Lock");

var logger1 = DoubleCheckAppLogger.Instance;
var logger2 = DoubleCheckAppLogger.Instance;

logger1.Log("Message from double-check singleton 1");
logger2.Log("Message from double-check singleton 2");
Console.WriteLine($"Same instance: {ReferenceEquals(logger1, logger2)}");
The first null check happens before acquiring the lock. Once the Singleton instance has been created, future calls directly return the existing object without entering the locked block.
The second null check still happens inside the lock because another thread may have created the instance while the current thread was waiting. This approach is known as double-check locking.
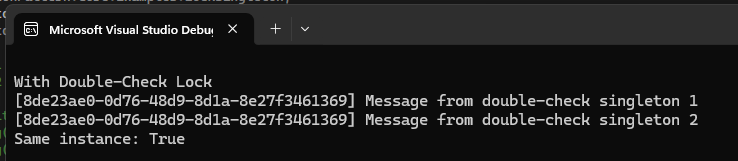
The output for lock with double-check is shown below:
Singleton Using Lazy<T>
Instead of manually handling locks and null checks, .NET provides the Lazy<T> class, which gives us a cleaner way to create a lazily initialized Singleton.
public sealed class LazyAppLogger
{
    private static readonly Lazy<LazyAppLogger> InstanceHolder = new(() => new LazyAppLogger());

    private LazyAppLogger()
    {
    }

    public static LazyAppLogger Instance => InstanceHolder.Value;

    public Guid InstanceId { get; } = Guid.NewGuid();

    public void Log(string message)
    {
        Console.WriteLine($"[{InstanceId}] {message}");
    }
}
Usage example:
Console.WriteLine("With Lazy<T>");

var logger1 = LazyAppLogger.Instance;
var logger2 = LazyAppLogger.Instance;

logger1.Log("Message from lazy singleton 1");
logger2.Log("Message from lazy singleton 2");
Console.WriteLine($"Same instance: {ReferenceEquals(logger1, logger2)}");
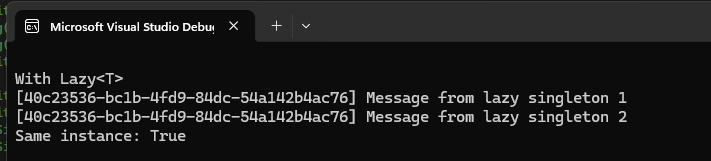
The LazyAppLogger object is not created when the class is loaded. The actual instance is created when InstanceHolder.Value is accessed for the first time through the Instance property. After the object is created, every future access returns the same instance.
Lazy<T> also provides thread-safe initialization by default, so we don't need to manually write locking logic for this scenario. The implementation becomes smaller and easier to understand while still providing lazy initialization and thread safety.
For manual Singleton implementations in modern C#, Lazy<T> is generally a cleaner approach compared to maintaining our own lock and instance creation logic.
The output for the Lazy<T> singleton is shown below:
Parallel usage example:
Console.WriteLine("Parallel access with Lazy<T>");
var messages = new ConcurrentBag<string>();

Parallel.ForEach(Enumerable.Range(1, 8), _ =>
{
    var logger = LazyAppLogger.Instance;
    var message = $"Parallel message from [{logger.InstanceId}] on thread {Thread.CurrentThread.ManagedThreadId}";
    logger.Log(message);
    messages.Add(message);
});

Console.WriteLine($"Parallel messages written: {messages.Count}");
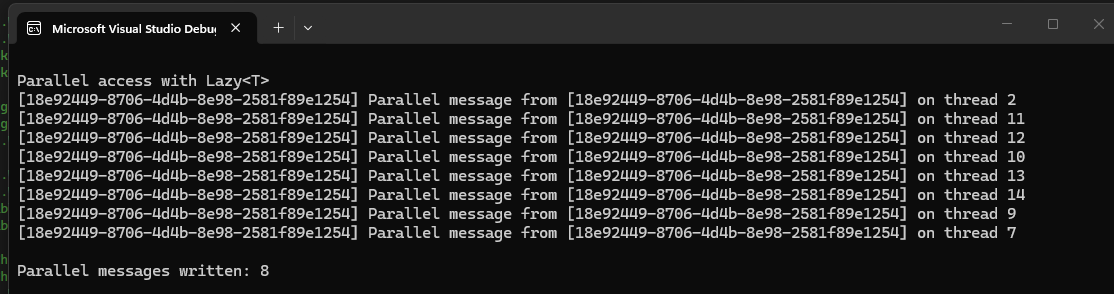
The parallel access output with Lazy<T> is shown below:
Singleton in Modern .NET Applications
In modern ASP.NET Core applications, we usually work with Dependency Injection. The built-in Dependency Injection container already provides a Singleton service lifetime, which means we often don't need to manually create a private constructor, static instance, or Instance property.
Let's create a normal logger service.
public interface IAppLogger
{
    Guid InstanceId { get; }

    void Log(string message);
}

public class AppLogger : IAppLogger
{
    public Guid InstanceId { get; } = Guid.NewGuid();

    public void Log(string message)
    {
        Console.WriteLine($"[{InstanceId}] {message}");
    }
}
This is a normal C# class. The constructor is not private and the class does not manage its own instance. Instead, we register it as a Singleton in Program.cs.
builder.Services.AddSingleton<IAppLogger, AppLogger>();By using AddSingleton, we are asking the Dependency Injection container to create one AppLogger instance and reuse the same object whenever IAppLogger is requested.
We can verify the same behavior in a minimal API endpoint by asking the container for the same service multiple times in a single request.
var builder = WebApplication.CreateBuilder(args);
builder.Services.AddSingleton<IAppLogger, AppLogger>();

var app = builder.Build();

app.MapGet("/api/logger/identity", (IAppLogger firstLogger, IAppLogger secondLogger, IAppLogger thirdLogger) =>
{
    firstLogger.Log("Request received");

    return Results.Ok(new
    {
        FirstInstanceId = firstLogger.InstanceId,
        SecondInstanceId = secondLogger.InstanceId,
        ThirdInstanceId = thirdLogger.InstanceId,
        FirstAndSecondSameInstance = ReferenceEquals(firstLogger, secondLogger),
        SecondAndThirdSameInstance = ReferenceEquals(secondLogger, thirdLogger),
        FirstAndThirdSameInstance = ReferenceEquals(firstLogger, thirdLogger),
        LoggerType = firstLogger.GetType().Name
    });
});

app.Run();
When this endpoint is called, the response shows the three InstanceId values and the ReferenceEquals results. Because the logger is registered with AddSingleton, all three parameters point to the same AppLogger instance within that request.

Manual Singleton or AddSingleton?
Even in modern .NET applications, both approaches are still useful, but they solve the instance management problem in different environments.
A manual Singleton class controls its own object creation. The class has a private constructor and exposes the instance through a static property such as AppLogger.Instance. This approach can still be useful when building a standalone C# library, a small utility, or code that does not use a Dependency Injection container. The class does not depend on ASP.NET Core or Microsoft Dependency Injection to maintain its single instance.
In an ASP.NET Core application, AddSingleton is usually the better approach for application services. The Dependency Injection container manages the object lifetime, and other classes can receive the service through constructor injection. This keeps dependencies visible and also makes the service easier to replace with another implementation during testing.
For example, if IAppLogger is registered with AppLogger, we can replace it with another implementation without changing the classes that use the logger.
builder.Services.AddSingleton<IAppLogger, FileAppLogger>();The controllers and services using IAppLogger do not need any changes. With a manually implemented Singleton accessed through AppLogger.Instance, the application is directly coupled to the concrete AppLogger class.
So, using modern .NET does not mean the Singleton Design Pattern no longer exists. AddSingleton is essentially a container-managed way of maintaining one service instance for the application lifetime. The main difference is who controls the instance: the class itself or the Dependency Injection container.
When Should You Use Singleton?
Singleton is useful when the same service instance can safely be shared throughout the application and creating separate instances does not provide any benefit. A shared application cache, a service that holds application-level metadata, or an expensive reusable component can be suitable examples.
The important thing is to understand whether the service contains state. Since a Singleton object is shared, any data stored inside the object is also shared. If multiple parts of the application update that data, we need to consider thread safety and concurrent access.
Singleton should not be selected only because we want to reduce object creation. In most applications, creating normal service objects is not a performance problem. The lifetime should be selected based on how the service behaves and whether sharing the same instance is actually correct for the application.
For ASP.NET Core application services, prefer AddSingleton when the service is already managed through Dependency Injection. Use a manual Singleton when the class needs to manage its own single instance and is designed to work independently from a DI container.
Conclusion
The Singleton Design Pattern ensures that only one instance of a class is created and reused wherever it is required. A basic implementation uses a private constructor and static instance, but concurrent access can introduce thread safety problems. We can solve these problems using locking, while Lazy<T> provides a much cleaner option for lazy and thread-safe initialization.
In modern .NET applications, Dependency Injection usually manages Singleton services through AddSingleton. The pattern is still the same at a high level: one instance is created and reused. The difference is that the DI container manages the object's lifetime instead of the class managing the instance itself.
Understanding both approaches is useful because not every C# project uses Dependency Injection, while most modern ASP.NET Core applications do. Once we understand who should control the instance and whether sharing the same object is correct, choosing between a manual Singleton and AddSingleton becomes much easier.
You can find the complete source code for all the Singleton examples used in this article on my GitHub repository:
GitHub: https://github.com/YogeshHadiya33/SingletonDesignPattern
Thank you for reading. I hope this article helps you understand the Singleton Design Pattern and how it fits into modern .NET applications.