
The Factory Method pattern becomes useful when code needs one object from a group of related objects, but the calling code should not decide which concrete class to create. Instead of placing that decision in a controller or service, we move it to a dedicated factory. That keeps object creation in one place and makes the rest of the code easier to read.
A notification system is a simple way to understand this idea. A request may ask for Email, SMS, Push, WhatsApp, or Slack. The caller wants to send a message, but it should not need to know which concrete sender class should be instantiated for that type.
In this article, we will understand how the Factory Method pattern is applied to that scenario in .NET. The code is small, but it clearly shows the two main benefits of the pattern: centralized object creation and lower coupling in the calling code.
What Is the Factory Method Pattern?
The Factory Method pattern encapsulates object creation behind a method or class whose responsibility is to return the correct implementation. The caller works with a common abstraction, while the factory decides which concrete object to provide. This allows the behavior to vary without forcing the caller to reference every possible implementation.
This pattern is most useful when multiple classes share the same contract but differ in behavior. It is also useful when the final implementation depends on runtime data, such as a request value, configuration setting, tenant, or feature flag. In those cases, direct object creation in the caller usually becomes difficult to maintain.
The Problem
In this example, the API receives a notification type and a message. That input is represented by the request model shown below.
using System.ComponentModel.DataAnnotations;

namespace FactoryMethodDemo.Models;

public class NotificationRequest
{
	[Required(ErrorMessage = "Type is required.")]
	[MinLength(1, ErrorMessage = "Type cannot be empty.")]
	public string Type { get; set; } = string.Empty;

	[Required(ErrorMessage = "Message is required.")]
	[MinLength(1, ErrorMessage = "Message cannot be empty.")]
	public string Message { get; set; } = string.Empty;
}
The challenge is straightforward: the value in Type determines which sender should be used. If the type is Email, the code should use one sender. If the type is Sms or Slack, it should use a different one. Without a factory, that decision usually ends up in the controller, and the controller slowly becomes coupled to every notification implementation.
That coupling creates two problems. First, the calling code becomes harder to maintain because every new notification type requires edits in places that should only coordinate workflow. Second, object creation logic starts spreading across the codebase instead of staying in one predictable location.
Defining a Common Contract
The first step is to make every notification sender follow the same contract. That is done with the INotificationSender interface.
namespace FactoryMethodDemo.Interfaces;

public interface INotificationSender
{
	string Send(string message);
}
This interface is intentionally small, and that is a good thing. Every sender only needs to expose one operation: Send. Once the contract is in place, the rest of the code can depend on INotificationSender rather than specific classes such as EmailNotificationSender or SlackNotificationSender.
That abstraction is what makes the factory useful. A factory can only return different implementations cleanly when all of them fit behind one consistent contract.
Concrete Sender Implementations
Each notification channel is represented by its own class. All of them implement the same interface, but each one returns a channel-specific result.
using FactoryMethodDemo.Interfaces;

namespace FactoryMethodDemo.Services;

public class EmailNotificationSender : INotificationSender
{
	public string Send(string message)
	{
		return $"Email sent successfully. Subject: Notification. Body: {message}";
	}
}using FactoryMethodDemo.Interfaces;
namespace FactoryMethodDemo.Services;
public class WhatsAppNotificationSender : INotificationSender
{
public string Send(string message)
{
return $"WhatsApp message delivered to the contact list. Message: {message}";
}
}The same structure is used for SMS, Push, and Slack senders as well. The important detail is that these classes only contain channel-specific behavior. They do not decide when they should be selected, and they do not know anything about HTTP requests or controllers. That separation keeps each class focused on one responsibility.
Implementing the Factory
The central part of the pattern is the factory itself.
using FactoryMethodDemo.Interfaces;
using FactoryMethodDemo.Services;

namespace FactoryMethodDemo.Factories;

public class NotificationFactory
{
	private readonly IServiceProvider _serviceProvider;

	public NotificationFactory(IServiceProvider serviceProvider)
	{
		_serviceProvider = serviceProvider;
	}

	public INotificationSender CreateSender(string notificationType)
	{
		if (notificationType.Equals("Email", StringComparison.OrdinalIgnoreCase))
		{
			return _serviceProvider.GetRequiredService<EmailNotificationSender>();
		}

		if (notificationType.Equals("Sms", StringComparison.OrdinalIgnoreCase))
		{
			return _serviceProvider.GetRequiredService<SmsNotificationSender>();
		}

		if (notificationType.Equals("Push", StringComparison.OrdinalIgnoreCase))
		{
			return _serviceProvider.GetRequiredService<PushNotificationSender>();
		}

		if (notificationType.Equals("WhatsApp", StringComparison.OrdinalIgnoreCase))
		{
			return _serviceProvider.GetRequiredService<WhatsAppNotificationSender>();
		}

		if (notificationType.Equals("Slack", StringComparison.OrdinalIgnoreCase))
		{
			return _serviceProvider.GetRequiredService<SlackNotificationSender>();
		}

		throw new NotSupportedException($"Notification type '{notificationType}' is not supported.");
	}
}
This is the exact place where the Factory Method pattern is applied. The CreateSender method receives the notification type, checks which value was requested, and returns the correct implementation of INotificationSender. The caller does not create anything directly; it simply asks the factory for the right object.
Two details make this implementation practical. The type comparison is case-insensitive, which avoids brittle string matching. Also, the factory resolves the required sender from dependency injection only when it is needed.
That is the main reason IServiceProvider is used here instead of injecting EmailNotificationSender, SmsNotificationSender, PushNotificationSender, WhatsAppNotificationSender, and SlackNotificationSender directly into the constructor. If all sender objects were injected into the factory constructor, the container would create all of them when the factory itself is created, even though a single request uses only one sender. In a small demo the difference is minor, but the pattern is still worth understanding.
By resolving the sender inside CreateSender, only the required implementation is created for the current request. That keeps the constructor smaller, avoids unnecessary object creation, and is a better fit when the number of senders grows or when some implementations become heavier in the future.
Using the Factory in the Controller
Once the factory exists, the controller becomes much simpler. It no longer needs to know about all concrete sender types.
var sender = _notificationFactory.CreateSender(request.Type);
var deliveryDetails = sender.Send(request.Message);

return Ok(new NotificationResponse
{
	IsSuccess = true,
	NotificationType = request.Type,
	Message = request.Message,
	DeliveryDetails = deliveryDetails
});
This snippet is the most important part of the controller. The controller validates the input, asks the factory for the correct sender, calls Send, and returns the result. It does not contain new EmailNotificationSender() or any similar object creation logic.
That is the real improvement. The controller stays focused on request handling, while the factory stays focused on object selection. Each class has a clearer role, and the code becomes easier to extend without making the endpoint messy.
Registering the Senders
Because the factory resolves sender implementations from dependency injection, those sender classes must be registered first.
using FactoryMethodDemo.Factories;
using FactoryMethodDemo.Services;

var builder = WebApplication.CreateBuilder(args);

builder.Services.AddTransient<EmailNotificationSender>();
builder.Services.AddTransient<SmsNotificationSender>();
builder.Services.AddTransient<PushNotificationSender>();
builder.Services.AddTransient<WhatsAppNotificationSender>();
builder.Services.AddTransient<SlackNotificationSender>();
builder.Services.AddTransient<NotificationFactory>();
This setup ensures that the factory can resolve whichever sender is needed for the current request. If one of these registrations is missing, GetRequiredService<T>() would fail when that notification type is selected. In other words, the factory pattern here relies on DI not just for convenience, but as part of the creation mechanism.
Response Model and Output
The API returns a consistent response model regardless of which sender is selected.
namespace FactoryMethodDemo.Models;

public class NotificationResponse
{
	public bool IsSuccess { get; set; }

	public string NotificationType { get; set; } = string.Empty;

	public string Message { get; set; } = string.Empty;

	public string DeliveryDetails { get; set; } = string.Empty;
}
With the sample request from the HTTP file:
{
  "type": "Email",
  "message": "Hello World"
}
the sender returns the following delivery text:
Email sent successfully. Subject: Notification. Body: Hello World
If an unsupported type is sent, such as Fax, the factory throws a NotSupportedException, and the controller returns a BadRequest result using the exception message. That gives the API a clear failure path without mixing channel selection logic into the endpoint itself.
{
	"type": "Fax",
	"message": "This should fail"
}
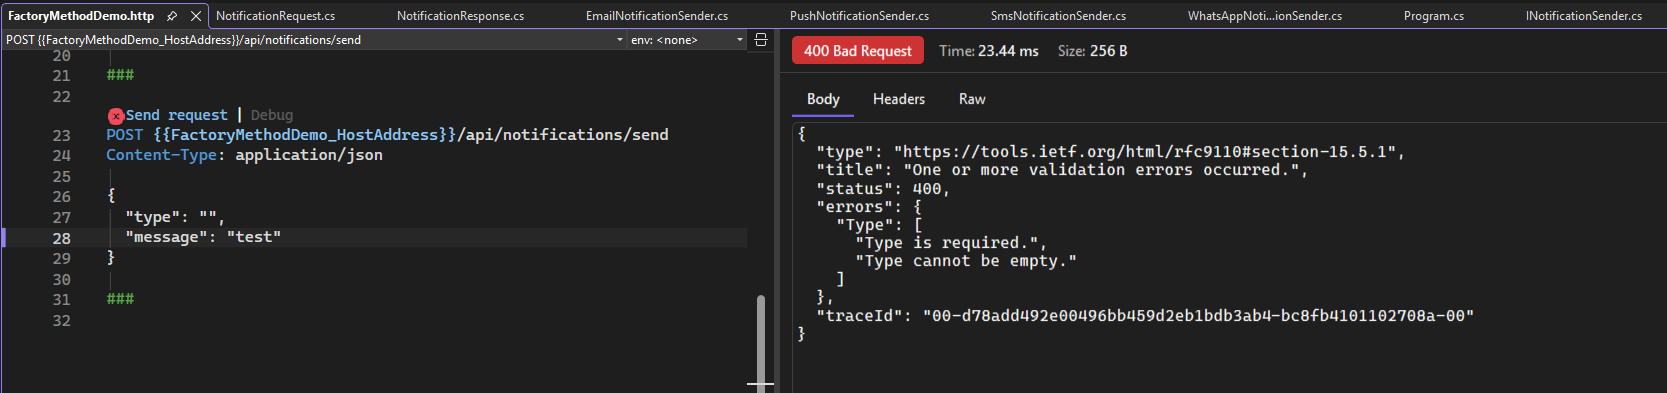
The HTTP file also includes a request where type is empty:
{
	"type": "",
	"message": "test"
}
That request fails model validation because Type is marked with Required and MinLength(1). In that case, the API returns a bad request validation response before the factory is called.
Why This Is a Good Use Case for Factory Method
This example fits the pattern well because the choice of implementation depends entirely on runtime input. There are multiple classes with the same contract, only one of them should be used for a given request, and the calling code should remain independent from those concrete classes.
The main advantage is centralized creation logic. All selection rules stay in one factory instead of being repeated in multiple places. The second advantage is lower coupling. The controller works with NotificationFactory and INotificationSender, not with five different sender classes. That small design change makes the code cleaner than it would be if object creation happened directly in the endpoint.
When Should You Use It?
Use the Factory Method pattern when the code needs to choose one implementation from several related implementations at runtime. Notification senders are one example, but the same idea applies to payment providers, file exporters, report generators, and storage strategies. In all of those cases, the caller wants the behavior, not the responsibility of constructing the right class.
This pattern is less useful when there is only one implementation and no realistic chance of variation. In that case, a factory often becomes unnecessary indirection. As with most design patterns, the goal is not to add extra classes for style. The goal is to move object creation to a place where it actually improves the design.
Conclusion
The Factory Method pattern helps separate object creation from object usage. In this notification example, that separation allows the endpoint code to stay focused on validation and response handling while the factory decides which sender should be used.
The design remains easy to follow: INotificationSender defines the contract, each sender class provides a concrete implementation, and NotificationFactory returns the correct sender based on the incoming type. That is exactly why this pattern is practical in .NET applications. It keeps the calling code cleaner and puts creation logic where it belongs.
It is also worth keeping the implementation simple. In this example, the factory uses straightforward if conditions and on-demand DI resolution. That is enough. There is no need to make the code harder to read with unnecessary abstraction when the selection rules are still small and clear.
If you want to explore the full source code, it is available on GitHub.